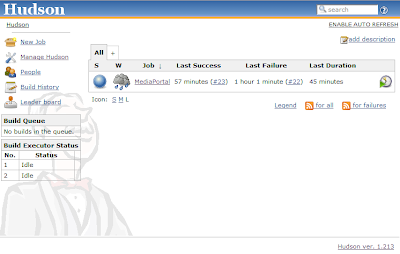
The below goals will be solved in this guide:
- Get the source code from the Subversion repository
- Link change logs to the repository browser using ViewVC
- Build the project using MBuild
- Run the tests using NUnit and display the results together with a trend graph
- Publish artifacts from the build (nightly builds)
- Run FxCop on an assembly and display warnings (linked with source code) and a trend graph
- Search the source code for TODO, FIXME comments and display the open tasks with links to the source code
Initial downloads
The following files are needed besides Java (at least 1.5). Get the latest version of all files and notice that the Hudson file has the extension .war and plugins .hpi. This guide assumes that MSBuild, NUnit and FxCop are already installed and working.
- Hudson server application (download)
- MSBuild plugin (download)
- NUnit plugin (download)
- Violations plugin (FxCop support among other such as Simian, CPD, PMD and PyLint) (download)
- Open Tasks plugin (download)
Installation steps
I'm going to install Hudson into c:\Program Files\Hudson.
- Copy the hudson.war file to c:\Program Files\Hudson
- Start Hudson through "java -DHUDSON_HOME=data -jar hudson.war". Verify that you can access Hudson through http://localhost:8080
- Copy the plugins to c:\Program Files\Hudson\data\plugins
- Stop Hudson by pressing Ctrl+C in the command prompt where you started Hudson.
- Start Hudson again and you should be set to go.
Hudson system configuration
Follow the following steps to configure the tools that Hudson will use in building MediaPortal.
- Go to the System configuration at http://localhost:8080/configure.
- MSBuild Builder - Set the path to the MSBuild tool to C:\Windows\Microsoft.NET\Framework\v2.0.50727\msbuild.exe

MediaPortal job configuration
- Click the "New job" link at the home page.
- Enter the name "MediaPortal", check the "Build a free-style software project" and press OK.

Source code management
MediaPortal uses a Subversion SCM. Hudson supports CVS and SVN out of the box, but there are many plugins for other SCMs. After checking out the files from the repository Hudson will show the new change sets since the previous build in the Build page. A detailed view of change sets can be seen in the Changes page as the name of the developer, files that were changed and the comment for the change. Each change set is linked to the MediaPortal subversion repository browser, so it is easy to browse the actual file that changed.
- Press the Subversion radio button to configure the SCM.
- Repository URL=https://mediaportal.svn.sourceforge.net/svnroot/mediaportal/trunk/mediaportal
- Local module directory=.
- Press the Advanced button
- Repository Browser=ViewSVN, URL=http://mediaportal.svn.sourceforge.net/viewvc/mediaportal/

To test the configuration, press Save and then Build. The source code will be downloaded from the repository and put into the Workspace. If there were any changes in the SCM repository they can be viewed in the Changes page.

When the build is completed verify that it has checked out the code by going to the Workspace page. Using the Workspace page you can browse and view the files that has been checked out and it doesn't matter if the files are on the master or on a distributed slave!

Building the project
Im going to build a Release version of MediaPortal using MSBuild and the mediaportal.sln solution file. Hudson also supports NAnt and many other build tools through plugins.
- Click the "Add build step" and select "Build a Visual Studio project or solution using MSBuild."
- MsBuild Build File=mediaportal.sln
- Command Line Arguments=/p:Configuration=Release

To test the configuration, press Save and then Build. Now the source code should be updated if there any changes and then built using MSBuild. While the build is running you can check the Console log that is updated as the build continues.

Running unit tests and showing the result
Hudson can read NUnit XML reports and display the results of them for each build. If a test fails, then it will be displayed in the Status page. Hudson will also show how many builds ago a test failed (it's age); that way it is simple to see if a test failed in the current build. If a build has at least one failing unit tests then the build will become Unstable (yellow); otherwise it is marked as Successful (blue). After two builds you will get a trend graph showing the test results over time. To run the NUnit tests, I'm running nunit-console from Hudson after the MSBuild has compiled all files.
- Click the "Add build step" and select "Execute Windows batch command"
- Command=
"c:\program files\nunit\bin\nunit-console.exe" MediaPortal.Tests\bin\RELEASE\MediaPortal.Tests.dll /xml=nunit-result.xml /config=test.config
exit 0 - Check the "Publish NUnit test result report" and enter "nunit-result.xml"

Start a new build, now the unit tests will be run and their results are collected at the end of the build. When the build is completed, you can see how many tests there were, and how many failed, in the build in the Status page.
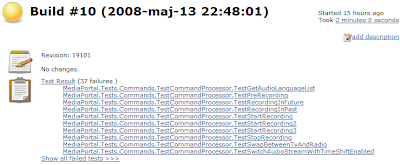
More information on namespace detail can be shown in the Test result page.
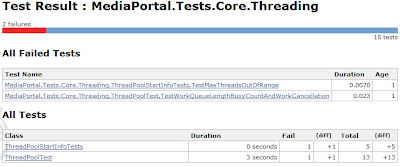
The test results are then displayed as a trend report. (This trend graph is copied from my python project, as it shows a variation over time)

Archiving build artifacts
It is good to archive the outputs (artifacts) from the build, so they can be retrieved later. This way it is possible to get a version of MediaPortal that was built a week ago, and compare the functionality to one built today. Hudson can be configured to store any number of files for each build, it can also be configured so only the latest successful build's artifacts are stored. As I'm not really sure what the output from MediaPortal is, I'm going to show how to archive the files for the MPInstaller.
- Click the "Archive the artifacts".
- Files to archive = MPInstaller\bin\Release\*

In the next build, Hudson will store all files in the MPInstaller release folder so it can be retrieved later even if there are newer builds available.

Analyzing code with FxCop
Hudson can collect output from several quality metric tools and show them for each build. Similar to the unit tests, they will be displayed in a trend graph. For .NET projects, it is good to use FxCop. FxCop analyzes managed code assemblies and can be very good to use but it may also generate too many warnings at start, in this example I will only use the security rules and analyze the Core.dll assembly.
- Click the "Add build step" and select "Execute Windows batch command"
- Command =
"c:\Program Files\Microsoft FxCop 1.35\fxcopcmd.exe" /file:Core\bin\Release\Core.dll  /rule:SecurityRules.dll /out:fxcop-result.xml
exit 0 - Check the "Violations" check box, and set fxcop=fxcop-result.xml
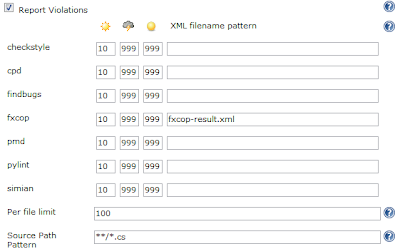
Next build will take considerate longer time, as FxCop goes through the assembly and analyzes it to find potential problems. When the build finishes, you will see a nice summary on how many violations there are in the current build.

Finding source code comments
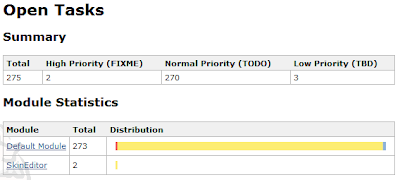
A nice plugin is the Tasks plugin as it will go through the sources, and find specific comments that should be watched. In this example I'm going to search for TODO or FIXME comments,
- Click the "Scan workspace for open tasks".
- Files to scan = **/*.cs
- High priority=FIXME
- Normal priority=TODO

If the plugin finds any comments in the source they will be displayed in the build page.
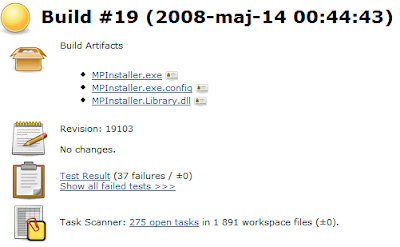
There will also be a trend graph so it is possible to monitor that the tasks are decreasing over time. Together with the summary on what comments were found, the full source code can be viewed.

Summary
I hope this was a useful guide to start building .NET projects with Hudson, one of the many CI servers. As shown above it does not take much configuration to start building a project using Hudson. The best way to start using continuous integration is to start building the project. Then focus on running unit tests and other quality metrics so you can monitor the quality progress on your project.
Currently there are some plugins in the pipeline that could be interesting for .NET developers:
- A SCM implementation for Microsofts Team System
- Support for CodePlex issues and Wiki words in change set comment. And a very simple configuration to check out code from a CodePlex project
- Support for displaying coverage stats using NCover and MS own coverage tool